Paper #1, Part 4: How to Test a Model Without Cheating
Before you can tell whether your classifier works, you have to measure it. The obvious way to measure has a trap in it, one the CS231n notes warn about. Here's the trap and the fix the course recommends.
Where we are: we have our first classifier, nearest neighbor (Part 3). Before building anything better, we need a way to measure whether a classifier actually works, without fooling ourselves.
Now we have a classifier (even if it’s just nearest neighbor). How do you know if it actually works?
Answer: we test it. Run it on some images and see how many it gets right. But there’s a trap here, one the CS231n notes warn about.
The Cheating Trap
Imagine you’re studying for an exam. You have a textbook and practice problems. Here’s the smart way to study:
- Read the textbook
- Do the practice problems (but don’t memorize the answers)
- Take a practice exam under test conditions
- See how you did
- Study the topics you got wrong
- Repeat with a new practice exam
Here’s the cheating way:
- Get a copy of the exam in advance
- Study the exact questions and answers
- Memorize the answers
- Take the real exam and ace it
- Feel smart
The second person doesn’t actually understand the material. They’ve memorized the specific test. If you change one number in a question, they’re lost.
Machine learning has the exact same trap.
The Split
The mistake looks like this: train your classifier on some images, then test it on those same images. Even the nearest neighbor classifier from Part 3 gets 100% accuracy this way, because the closest image to any training image is itself. That looks like a perfect score.
But it tells you nothing. The classifier would still fail on images it hasn’t seen.
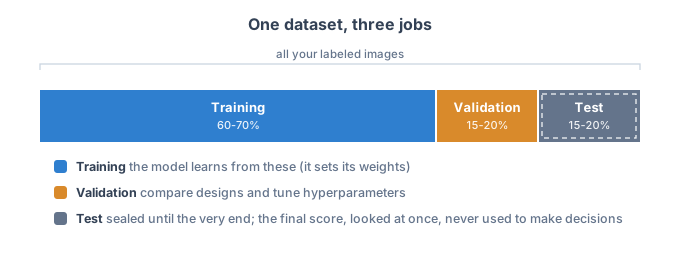
The fix CS231n recommends is to split your data into three groups:
Training set (typically 60-70% of your data): the images your classifier learns from. Nearest neighbor simply memorizes them. The classifiers we’ll build later adjust internal settings, called weights, to fit these examples. (There’s a second kind of setting, the hyperparameter, covered just below.)
Validation set (typically 15-20%): you don’t train on these, but you do use them to make decisions. After building several classifiers (or one classifier with several hyperparameter settings), you check each on this set to see which does best: “Should I use this feature? How many neighbors should I check?”
Test set (typically 15-20%): You don’t look at this until the very end, after all decisions are made. It represents “real world” images your classifier has truly never seen. Your final accuracy number comes from here, and this is what you report.
Weights and hyperparameters are the two kinds of setting I mentioned, and they’re easy to mix up. Think of baking a cake. You set a few dials yourself: the oven temperature, the timer, the pan size. Inside, as it bakes, thousands of tiny chemical bonds form and set the crumb, far too many to arrange by hand.
- The dials are hyperparameters: the handful of choices you make before baking.
- The crumb is the weights: the many internal values the classifier sets for itself while it learns.
You choose the hyperparameters; the training data sets the weights. (Nearest neighbor is an odd case: its one hyperparameter is k, how many neighbors to check, chosen up front like a pan size, and it has no weights at all, because it only memorizes.)
And just as you’d bake another cake at a new temperature if the first came out flat, you try different hyperparameters and keep whichever works best. That is what the validation set is for.
The key rule: once you’ve used the test set to measure accuracy, you cannot use that score to change the classifier’s design. Peeking at the test result and then tweaking a feature or hyperparameter to improve it is cheating. You’d be using the test set to make decisions, and a test score only means something if it comes from data your classifier’s design was never adjusted to fit.
Why This Matters
This distinction matters. Testing on held-out data tells you whether a classifier works on new images; testing on training data only shows what it memorized.
When you train on training data and test on training data, you’re measuring something called training accuracy. It tends to look better than performance on new images, because the classifier has already seen every answer.
When you test on held-out validation/test data, you’re measuring generalization accuracy: how well your classifier handles images it’s never seen. This is what matters in the real world.
The gap between training accuracy and test accuracy is a measure of overfitting: the classifier has latched onto quirks specific to the training images instead of patterns that also hold for new ones. We’ll go deeper in Part 11, but the principle starts here.
Cross-Validation
If you have a small dataset, a single train/test split is both wasteful and unreliable: the held-out 20% never gets to train, and your accuracy depends on which 20% you happened to pick. k-fold cross-validation fixes both.
Imagine you have 1000 images. Instead of a single train/test split:
- Divide the 1000 images into 5 equal groups (folds) of 200 images each
- Train on folds 1-4, test on fold 5 → record accuracy
- Train on folds 1-3 and 5, test on fold 4 → record accuracy
- Repeat until every fold has been the test set once
- Average the five accuracy numbers
This way, every image gets tested exactly once and every image is used for training four times. You get a more stable estimate of real performance without needing a huge dataset.
Cross-validation gives you an estimate, or helps you pick between settings; it doesn’t hand you a finished model. Once you’ve chosen a design, you retrain it on all the data. And if you used cross-validation to make those choices, still keep a separate test set aside for the final, untouched score, just as before.
The metaphor: instead of one final exam, you take five quizzes on different material. Your actual grade is the average.
The Rule CS231n Insists On
In CS231n (Stanford’s computer vision course this series works through) and every serious machine learning project, this rule appears somewhere:
“The test set should never be used to make any decisions.”
This sounds obvious, but a low test accuracy makes it tempting to “just tweak one parameter and see.” That’s the mistake: tweaking is what the validation set is for, and the test set is only for the final score. If you do tune against the test set, it has effectively become another validation set, and you need a fresh batch of held-out images that your tweaks have never seen to serve as the real test.
The only time you look at test accuracy is at the very end, when you’re reporting your final results.
What’s Next
Now that we know how to measure a classifier on held-out data, we can build actual classifiers. In the next post, we’ll build the simplest possible classifier beyond nearest neighbor: a linear classifier. It’s going to score each image with a weighted sum of its pixel values, and those weights are going to learn from the training data in a way nearest neighbor never could.